Focal length what is it? Understanding camera terminology can be intimidating. When learning about photography for the first time as a fresh 16-year-old, the whole terminology behind the camera, and sitting in a lecture about how the camera works, did nothing for me. I wanted to be out there with my DSLR taking a photo and learning on the go. Instead the course talked about the history of photgraphy. Not everyone wants to learn on the type of glass they used for the first lens. So I have taken it upon myself to keep things a bit simpler when sharing the art of photography. Onto something that baffled me for a while, focal length – what is it?
What is it?
Focal length is the basic description of a lens. It is not a measurement of the actual length of a lens, instead, it represents a calculation (in mm) of an optical distance from the point where light rays converge to form a sharp image of an object to the sensor at the focal plane in the camera. The focal length calculation is determined when the lens is focused at “infinity.” That’s the scientific explanation of what focal length is. But what does that mean?
Lens focal length tells us how much of the scene can be shot (angle of view), and how large individual elements will be (magnification):
The human eye has an equivalent focal length of 45mm.
The longer the length, the narrower the angle of view and the higher the magnification.
This photo has a focal length of 400mm.
The shorter the length, the wider the angle of view and the lower the magnification.
This photo was taken with a 50mm lens.
Using Focal Length
It’s all well knowing what it is, but how do you use it in practical application?
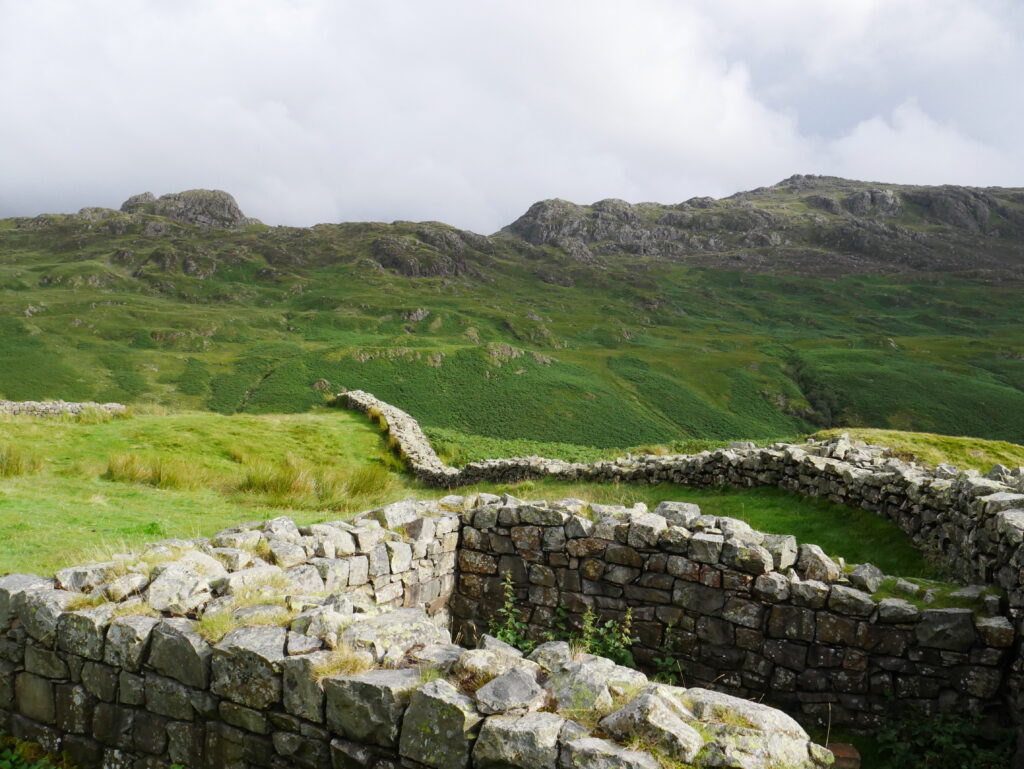
Wide Angle Lenses Usually any lens under 50mm. These are practical for landscape photography, as well as interiors. The image on the left is of Hardknott Fort in the UK, taken with an 11-24mm lens.
Prime 50mm Lenses A prime lens refers to a non-zoom/telephoto lens. It has a fixed length. 50mm is the closest to our eyesight so is often used in portraiture. This photo uses a 50mm f/1.8 lens.
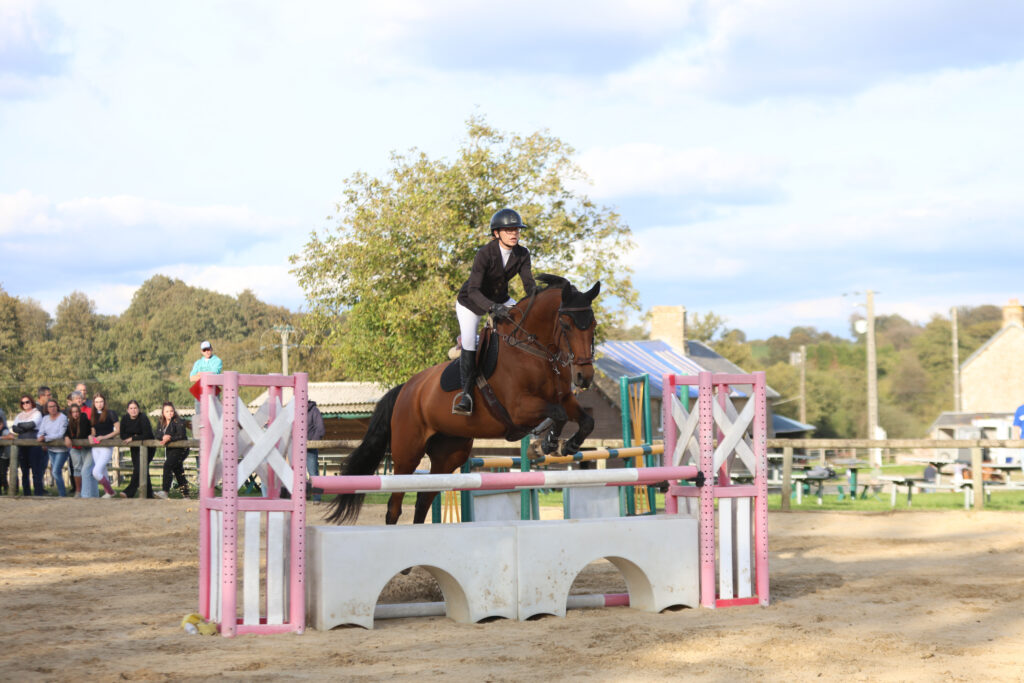
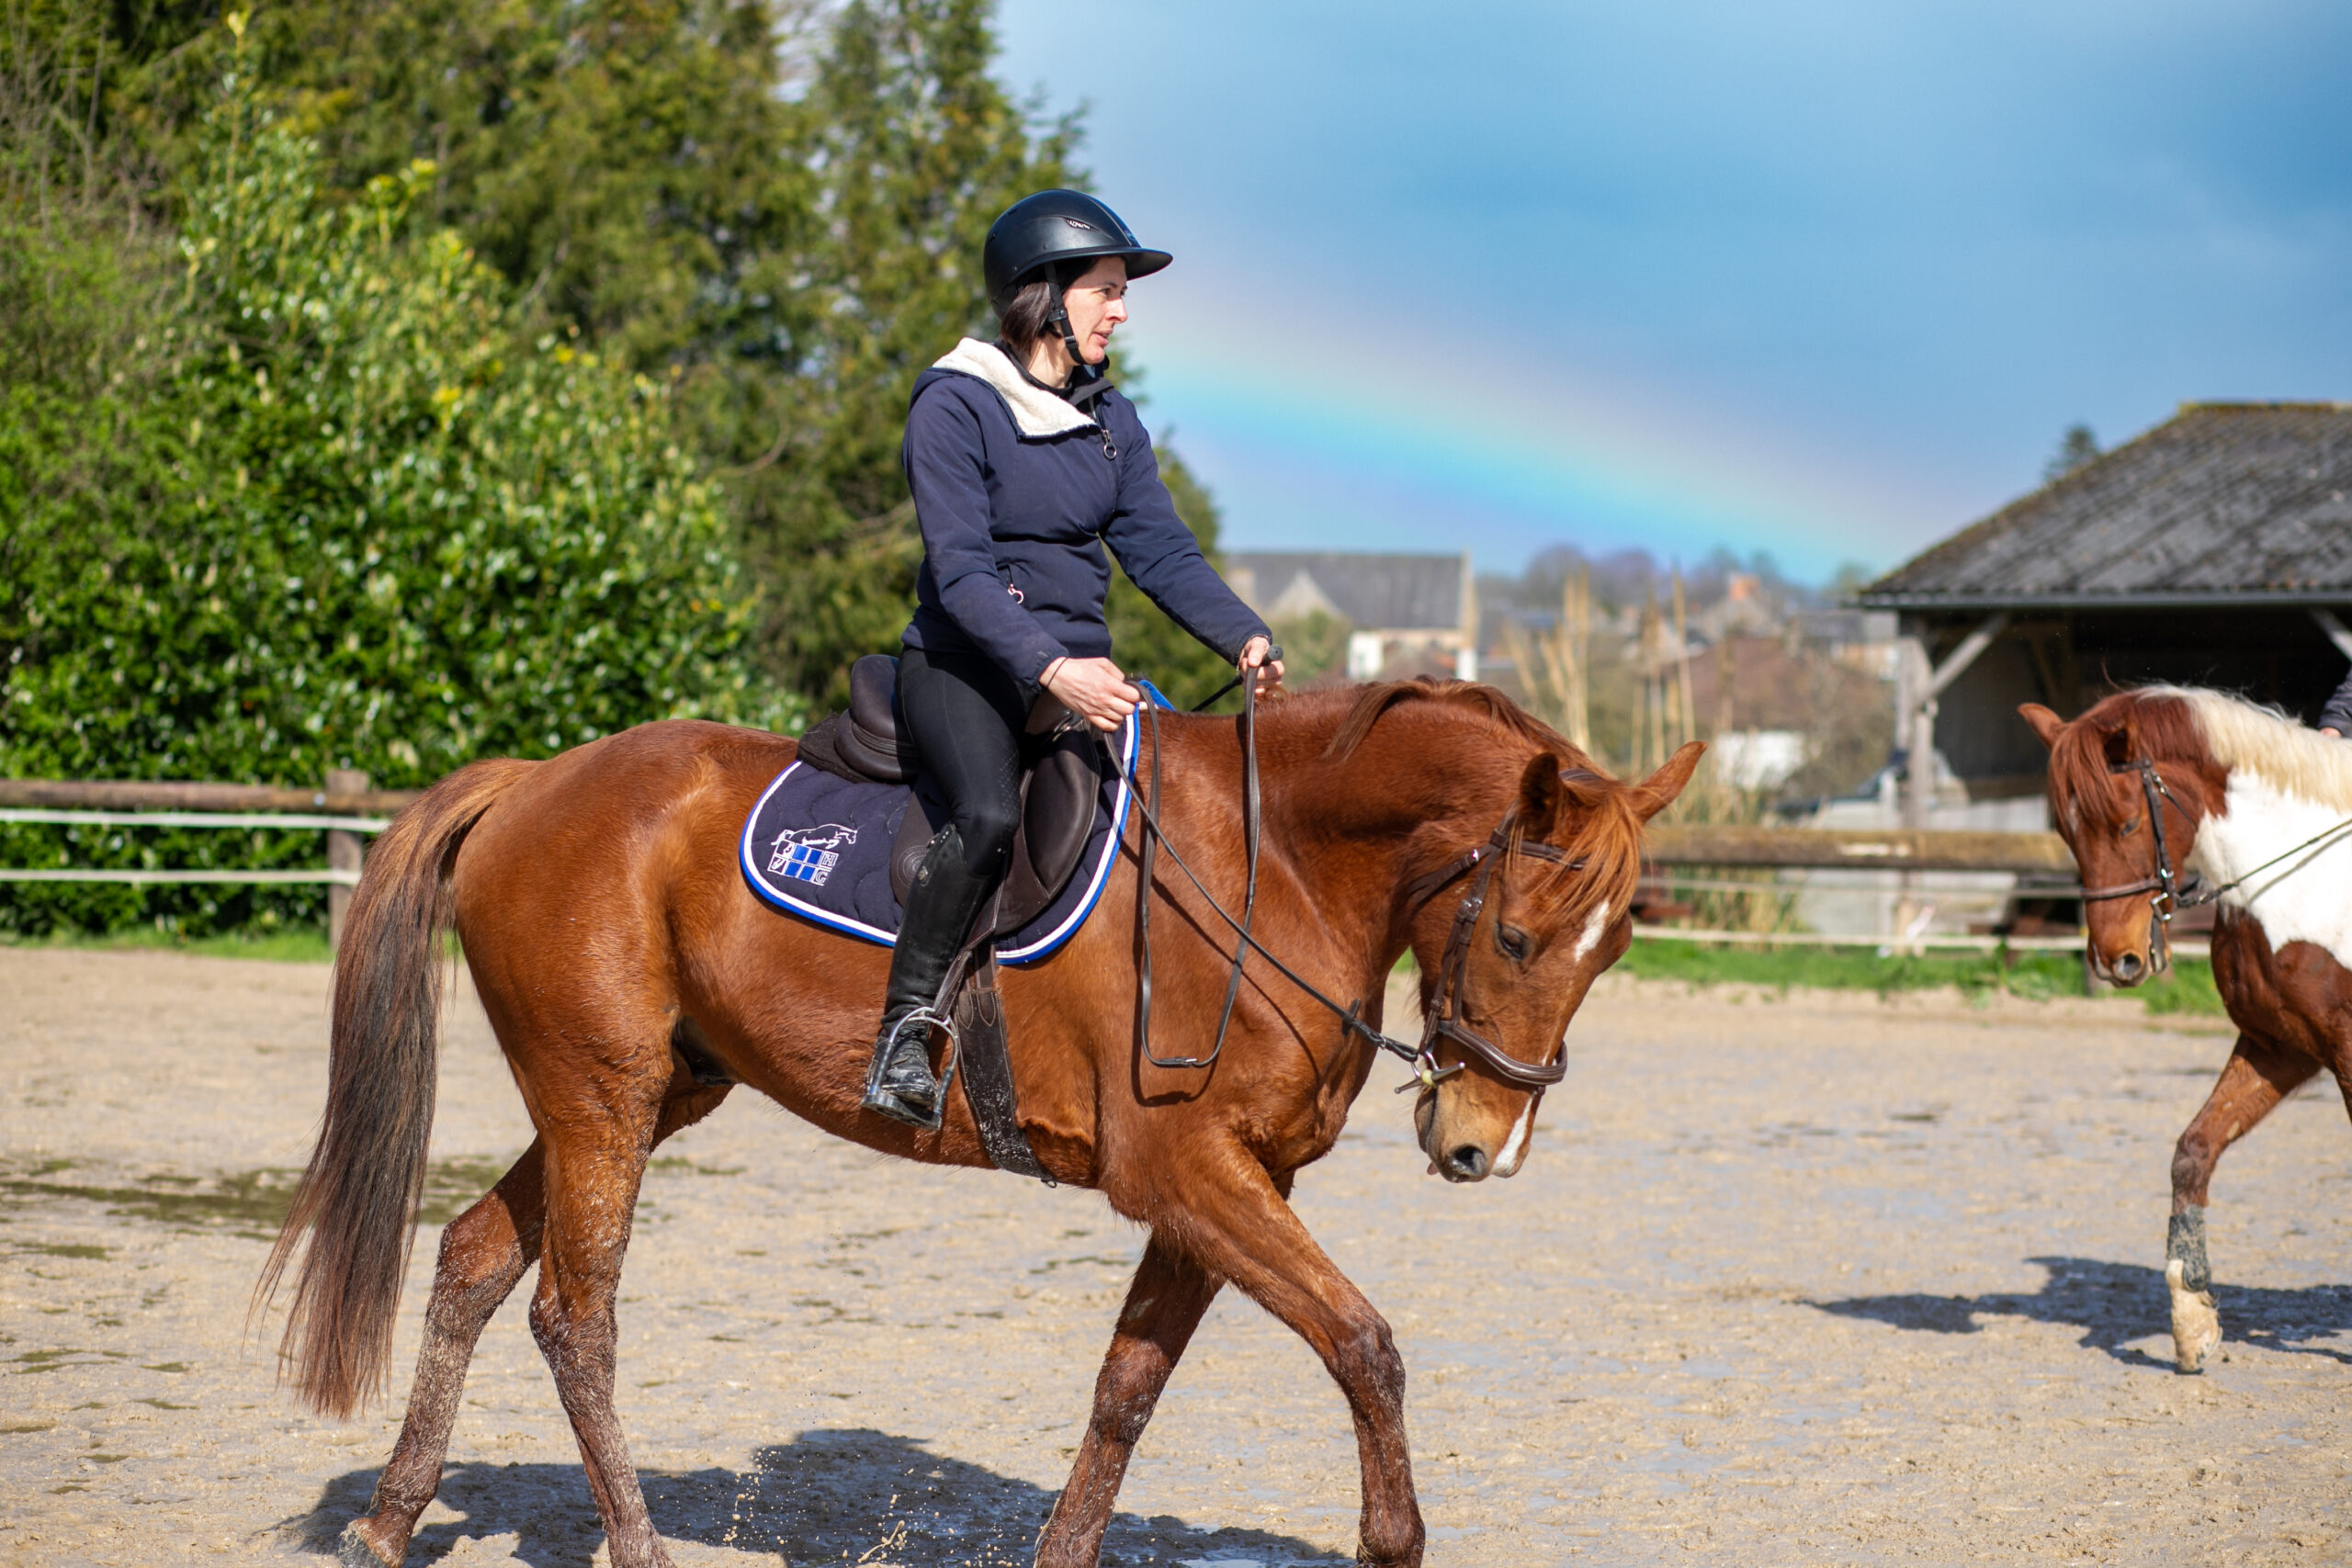
Telephoto 70-200mm Lenses Telephoto or zoom lenses refer to lenses that can move between two focal points. A popular one is 70-200mm or 70-300mm. The image of the bay mare jumping is around 100mm. Perfect for pitch sports, or events taking place at a reasonable distance.
Super Telephoto 150-600mm A lens length over the 300mm mark is the industry standard for nature photography or sports. Personally, I used the Sigma 150-600mm for bird photography, as well as sports photography.
Where is the Focal Length?
The length of your lens is marked on the front of the glass, as well as on the side of telephoto lenses. The information is stored within the metadata of your photos and available to see in editing programs, and the raw file itself.
What is it?(in Numbers)
If you want to get into the details of angles, here is a conversion of focal length to the angle of view:
Focal Length
Angle of View
12mm
122°
16mm
107°
24mm
84°
35mm
63°
50mm
47°
70mm
34°
90mm
27°
100mm
24°
200mm
12°
400mm
6°
It is important to remember that the angle of view can cause distortion of an image. This is why using the lens correction function is so important in editing, especially with images of people!
A challenge for all outside photographers: Sports in the rain.
The weather at the end of the year has always been temperamental in my experience of the northern hemisphere. What may start off as a cloudless blue sky can often morph into thick grey clouds unloading a deluge of rain, hail, or even snow. In my time as a sports photographer, I often see other photographers run and take cover during the rain and cover their equipment, while I am out there with my camera and lens facing the precipitation without so much of batting an eyelid. Of course, I know electricity and water do not mix, but surely a camera costing over a grand would withstand more than sunshine? That’s where the weatherproof, waterproof argument comes in.
Personally, I love the challenge of shooting in the rain. The amount of drama that can be captured through the motion of water, not just falling but from the splash effect of mud and puddles. Some of my favourite shots are from unexpectedly rainy days, including my last snapshot post here.
This post covers all the things I wish I knew before I started taking pictures in the rain, as well as some tips and tricks on equipment and settings!
Canon6Dii with 150-600mm Sigma lens 1/800 f/6,0 ISO 2000
What is Weatherproof?
Typically, a weatherproof camera has a number of seals around any points of dust and water incursion, which protect it against rain or splashes of water (rather than dropping it in a body of water). This means that a little fall of rain will rarely cause damage. However, continuous shooting in heavy rain can counteract weatherproofing.
The first thing is to know your gear. Some camera bodies are “weather resistant” and some are not. For example, the Canon 6D is not weatherproof, whereas the Canon 6Dii is. Lenses are also weather resistant so be aware that cheaper lenses may not be!
Be aware that using camera gear that is not weather-resistant can lead to water damage and other complications, such as fungus in the lens. To be sure this does not happen, regardless of your gear, make sure everything is dried out and cleaned thoroughly after the shoot.
Waterproof cameras are designed for total submersion, for people like scuba divers – so not a necessity for a sports photographer who sits out in the rain!
Extra Rain Equipment
Preparation for rainy shoots both expected and unexpected, I have found the best emergency rain gear for my set up is as follows:
Microfibre cloth – This is a game changer. You should have one of these anyway, but especially a life-saver in the rain. After getting rain in all the places, the screen, the viewfinder, and the lens, the best way to avoid smears from wiping the water away is with a quick rub with one of these beauts.
Plastic bag – These can be folded down really small, so great for packing in a corner spot. Plastic bags are waterproof, a cheap alternative to spending out on a designer Gortex camera poncho sleeve. I simply wrap the bag around the body and lens joint when in a pinch to ensure that the seal does not get broken. Be sure to remember that if you are working with horses some may find plastic bags the scariest thing out there so be mindful!
Duct Tape – Attach the bag to the camera in a more heavy-duty fashion. It is also just super handy to have on you encase equipment fails. Looking at you my non-trusty monopod!
A Wide-Brimmed hat – Handy on sunny days and rainy days. Personally, I find a baseball cap does the job for me providing extra cover between the sky and the viewfinder. I’ve encountered other photographers who use fishing hats or outback-style hats to the same degree.
Towel – This one is for you. Inevitably, you will be soaked to some degree. I wear a camera harness inside my main coat. This means when I shoot, the coat is open.
Gloves – Rain is cold. Cold hands are slow. This may be just my thing, but having gloves or some sort of hand protection during the rain can be a game-changer!
Canon6Dii with 70-200mm EOS lens 1/1000 f/4,0 ISO 1000
Sports in the Rain Tips and Tricks
One positive of shooting on consistent rainy days is not having to worry about what the sun is doing. Rainy, overcast days act like a giant soft box in terms of lighting so you don’t have to be rushing through settings to adjust to ever-changing cloud coverage and heady brightness. There are no harsh shadows either, meaning that everywhere your camera points are pretty much even. This works great for photographing people – a natural lightbox with soft shadows -works wonders to bring out the good side!
Want to capture the rain in all its glory? The trick is shutter speed. The higher the shutter speed, the better the rain will look frozen in mid-air for the photo.
Typically, I like to use a minimum shutter speed of 1/800 to capture the “splash” images. However, you do need to remember the exposure triangle, as I have mentioned in previous posts to make sure that the image comes out balanced.
A general overview of my rainy settings during the day are:
ISO limited 2000 f/4.0 – f/6.0 1/800-1/1250
One of the biggest challenges to shooting in the rain is the focus. The auto-focus on your camera may jump around as it is picking up the rain between you and the subject. Especially if you are using the `AI-SERVO for capturing sports. Plan on having some out-of-focus images, especially if there is heavy rain – don’t be too critical either!
Keep your lens hood attached! This may seem logical to some, but having the lens hood on will add extra protection to the front element of your lens, meaning less fog and fewer unwanted droplets.
Another simple tip is to shoot out of the wind. What is worse than rain – rain blowing straight into your face and camera lens. If possible, find a spot that has some natural shelter from the wind and rain, or at least the wind!
Canon6Dii with 70-200mm EOS lens 1/1000 f/4,0 ISO 1000
After the Shoot
It may be very tempting to pack up, remove lenses and shove everything into your bag as soon as possible during a rainy shoot, but that is not the best idea. Keep the lens attached to the body, as the seal is still in place.
Probably the most important thing you can do when shooting in the rain is what you do after. If you have the luxury of being able to dry your camera and put it away properly, do it. If not it is best to leave the camera assembled until you have the chance to make sure it is dry.
When you have the chance to attend to your wet camera, if you have not done so already, take the camera apart and give it a full wipe-down. Use the aforementioned microfibre cloth to dry and clean the lens elements. Make sure to fully extend any telephoto lenses if it has a body that grows and shrinks as you zoom in and out to ensure dryness. If you are not sure it is 100% dry, place all your gear on a towel in a dry warm place. Do not place it near a heat source like a fire or a heat vent as these could cause other types of damage to your gear.
Canon6Dii with 150-600mm Sigma lens 1/800 f/6,0 ISO 2000
In my latest shoot, I had the misfortune of it being both rainy, windy, and bright. Meaning that I was constantly scrolling through my shutter and ISO to balance pictures. I did have the luxury of a warm cafe in between classes. Nothing beats warming up in front of a fire with ever-so-needed coffee! This did allow me to make sure all my equipment was still functioning properly. And not getting swamped throughout the day, unlike me. With the rain, setting up for where the best shots took me less time. This probably meant that I did not find the best places either. All being said, I did manage to get some dramatic puddle shots as well as some lovely jumping pictures.
The most important part of shooting in the rain is making sure you are waterproofed too. A good coat, and as I mentioned, a hat and gloves are essential, especially in the colder months. So wrap up warm, grab a coffee to go, and get out there!
Is there anything I missed? Let me know in the comments!
Welcome to Photography 101, the ultimate guide and introduction to Photography. I have spent many years as a professional, writing over 100 posts on tips, and tricks, as well as sharing my own photos and experiences. To celebrate my 10th year as Briony Molly Media, I thought about sharing all the basics in one long and epic post.
Photography 101
Photography 101
Introduction
Photography is an art form that has been around for centuries. From the first daguerreotypes to modern digital cameras, photography has evolved to become an integral part of our lives. Whether it’s capturing memories of special moments, documenting the beauty of the world around us, or creating works of art, photography is a powerful tool. It is used to express ourselves and connect with others.
So, what makes a good photograph? While there are many factors that contribute to a great photo, here are a few key elements to consider:
Composition: The way elements are arranged within the frame can make or break a photo. Whether it’s following the rule of thirds, using leading lines, or experimenting with negative space. The way you compose your photo can have a huge impact on its visual impact and storytelling.
Lighting: Light is one of the most important factors in photography. Whether it’s natural light or artificial. The way light falls on your subject can dramatically change the mood and feel of your photo. Experimenting with different lighting sources and techniques can help you achieve the look you want.
Focus: The focus of your photo is where your viewer’s eye will naturally be drawn. By controlling the focus, you can guide your viewer’s attention. Creating a sense of depth and dimension in your photos.
Post-processing: While it’s important to get the right shot in camera, post-processing can help you fine-tune your images and take them to the next level. From adjusting exposure and color to cropping and adding filters, there are many tools and techniques available to help you create the look you want.
Of course, these are just a few elements to consider when it comes to photography. Whether you’re just starting out or have been shooting for years. The most important thing is to keep experimenting, trying new things, and pushing yourself creatively. By doing so, you’ll not only improve your skills as a photographer. But also discover new ways to express yourself and connect with others through the power of images.
DSLR cameras have become a popular choice for amateur and professional photographers alike. They offer a wide range of features and flexibility that makes them ideal for capturing stunning images in a variety of settings. But with so many options available, it can be overwhelming to choose the right DSLR camera for your needs. Here are a few things to consider when shopping for a DSLR camera:
Sensor Size: One of the most important factors in a DSLR camera is the size of its sensor. A larger sensor allows for more light to be captured. Which results in higher-quality images with better dynamic range and less noise. Full-frame sensors are the largest available. However, they also tend to be more expensive. APS-C sensors are a popular choice for many photographers, offering a good balance of cost and image quality.
Megapixels: Megapixels aren’t the most important factor in image quality. Yet they can still play a role in the sharpness and detail of your photos. More megapixels means larger image files, which can be beneficial if you plan to print your photos in larger formats.
Lens Compatibility: Another important factor to consider when choosing a DSLR camera is lens compatibility. Many manufacturers offer their own line of lenses that are compatible with their cameras. There are also third-party options available. Make sure to research which lenses are compatible with the camera you’re considering.
Autofocus System: DSLR cameras offer a range of autofocus options. From basic single-point autofocus to more advanced systems that can track moving subjects. Consider the types of photography you plan to do and choose a camera with an autofocus system that fits your needs.
Video Capabilities: If you plan to shoot video with your DSLR camera, consider the resolution and frame rates it offers. Many modern DSLR cameras offer 4K video capabilities, as well as a range of frame rates for slow motion and fast action.
When choosing a DSLR camera, it’s important to find one that fits your specific needs and budget. By considering these factors and doing your research, you can find a DSLR camera that will help you capture stunning images and unleash your creativity as a photographer.
Understanding the different settings on your camera is essential to capturing great photos. Automatic modes can be convenient. But taking control of your camera’s settings can help you achieve the results you want and take your photography to the next level. Here are a few key settings to consider when shooting:
Aperture: The aperture controls the amount of light that enters the camera and affects the depth of field in your photos. A wide aperture (low f-number) will create a shallow depth of field. Blurring the background and keeping your subject in focus. A narrow aperture (high f-number) will create a deeper depth of field, keeping more of the image in focus.
Shutter Speed: The shutter speed determines how long the camera’s shutter stays open. Controlling the amount of light that enters the camera and how motion is captured in the image. A faster shutter speed (such as 1/1000th of a second) will freeze motion. A slower shutter speed (such as 1/30th of a second) will create motion blur.
ISO: ISO controls the camera’s sensitivity to light. A higher ISO setting can help you capture photos in low-light situations, but it can also introduce digital noise into the image. Lower ISO settings are ideal for bright conditions and can produce cleaner images.
White Balance: White balance controls the color temperature of the image, ensuring that whites appear white and colors are accurate. Different light sources (such as sunlight or fluorescent bulbs) can have different color temperatures, so adjusting the white balance can help you achieve the desired look for your photo.
Exposure Compensation: Exposure compensation allows you to adjust the overall brightness of your image. By increasing or decreasing the exposure, you can brighten or darken the image to better capture the mood and tone of the scene.
Experimenting with different combinations of these settings can help you achieve the look you want and capture stunning photos. Don’t be afraid to try new things and push your creativity as a photographer!
Next in Photography 101 is Composition. Composition is one of the most important elements of photography. It involves arranging the various elements of a photo in a way that is visually appealing and helps to communicate the message or story you want to convey. Whether you’re taking photos of landscapes, people, or still life, understanding the principles of composition can help you create powerful and impactful images. Here are a few key elements to consider when composing your photos:
Rule of Thirds: One of the most well-known principles of composition is the Rule of Thirds. This involves dividing your image into thirds both horizontally and vertically, and placing your subject at one of the intersecting points. This creates a more dynamic and visually interesting image than placing the subject directly in the center.
Lines and Shapes: Paying attention to the lines and shapes in your photos can help you create a sense of movement and flow. Diagonal lines, for example, can create a sense of motion and energy, while curves can add a sense of grace and fluidity.
Depth: Creating a sense of depth in your photos can add a greater sense of realism and immersion. This can be achieved through techniques. A shallow depth of field blurs the background. Or placing objects at varying distances from the camera to create a sense of foreground and background.
Framing: Using natural or man-made elements to frame your subject can add interest and context to your photos. This could be a tree branch framing a sunset, or a doorway framing a person.
Balance: Creating balance in your images can help to create a sense of harmony and stability. This can be achieved through techniques such as using symmetry or balancing the visual weight of different elements in the photo.
By paying attention to these principles of composition, you can create more engaging and impactful photos. Experiment with different techniques and find what works best for your particular subject and style.
Lighting can drastically affect the mood and tone of your images. Whether you’re shooting in natural light or using artificial lighting sources, understanding different lighting techniques can help you achieve the results you want. Here are a few key lighting techniques to consider:
Natural Light: Shooting in natural light can produce stunning results, but it’s important to be mindful of the quality of light. The golden hour (the hour after sunrise or before sunset) is often the best time to shoot, as the light is soft and warm. Shooting in direct sunlight can be challenging, but using a reflector or diffuser can help soften the light and create more even lighting across the subject.
Artificial Light: Using artificial lighting sources such as studio lights, speedlights, or even household lamps can give you greater control over the lighting in your photos. One common technique is the use of a key light, which is the main light source used to illuminate the subject. Fill lights can be used to fill in any shadows, while backlighting can create a dramatic effect by highlighting the subject’s silhouette.
High Key Lighting: High key lighting involves using bright, even lighting to create a light and airy feel. This technique is often used in portraits, fashion photography, and product photography to create a clean, bright image.
Low Key Lighting: Low key lighting involves using darker, more dramatic lighting to create a moody or mysterious feel. This technique is often used in portrait and still life photography to create a sense of drama or depth.
Rembrandt Lighting: Named after the famous Dutch painter, Rembrandt lighting involves using a key light to create a triangle of light on one side of the subject’s face. This technique can create a sense of depth and dimensionality, and is often used in portrait photography.
By understanding different lighting techniques and how they can be used to achieve different effects, you can take your photography to the next level and create stunning, professional-looking images.
Photo by Jessica Lewis 🦋 thepaintedsquare on Pexels.com
Photo Editing
An essential part of modern photography. Whether you’re a professional photographer or just starting out, photo editing can help you enhance your images and create the exact look and feel you’re after. Here are a few key tips for effective photo editing:
Use the Right Tools: There are many photo editing software options available, from free options like GIMP to more advanced programs like Adobe Photoshop or Lightroom. Choose the software that works best for you and your needs, and take the time to learn how to use it effectively.
Adjust Exposure: Exposure is one of the most important elements of a great photo, and adjusting it can help you bring out detail and make your images more vibrant. Use tools like brightness, contrast, and highlights/shadows to adjust exposure and bring out the best in your images.
Crop and Straighten: Cropping and straightening can help you improve the composition of your images and remove any distracting elements. Use the crop tool to trim the edges of your photos and the straighten tool to align any crooked lines or horizons.
Colour Correction: Adjusting the colours in your images can help you achieve a specific look or feel. Use tools like saturation, hue, and temperature to adjust the colour balance and make your images more vibrant or subdued.
Sharpening: Sharpening can help you bring out detail and make your images look more crisp and clear. Use the sharpening tool to enhance edges and make your images more visually appealing.
Experiment with Filters and Effects: Filters and effects can add a creative touch to your images and help you achieve a specific style or mood. Experiment with different filters and effects to find the ones that work best for your images and personal style.
Remember, photo editing is a creative process and there are no hard and fast rules. Experiment with different techniques and find what works best for you and your images.
Overall
With practice and patience, you can create stunning, professional-looking photos that truly capture the essence of your subject. Take time to find your niche, and what you enjoy. Don’t beat yourself up that your images aren’t wonderful first time round!
What do you feel is the best tip for a beginner? Let me know in the comments!